Kavi’s Special Tomato Preserve

ThakkaliThokku5

Did you know that the cooking process increases the antioxidant activity in tomatoes, which can offer you many health benefits? Cooked tomatoes are low in calories and fat and supply you with a good dose of protein and fiber. Tomatoes contain a good dose of vitamin C and iron too, that the cooking process doesn’t destroy. So if a juicy slice of fresh tomato is your idea of a tasty and nutritious snack, consider adding cooked tomatoes to your diet as well.

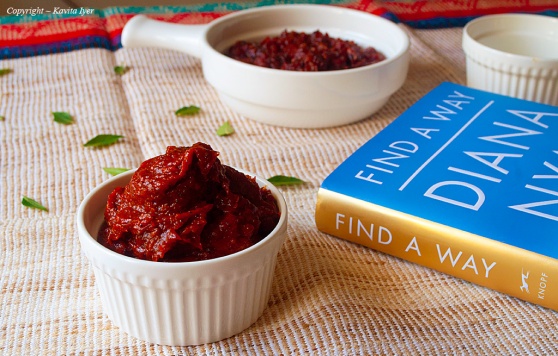
Fresh, locally grown tomatoes are one of summer’s greatest gifts. I for one, as soon as summer starts, go to the local market where the freshest produce comes from the nearby farms and pick up the juiciest luscious blood-red ripe tomatoes to make my very own tomato preserve, which in Tamil (where it originates from) is known as Thakkali Thokku. Thakkali means Tomato and Thokku means Preserve.

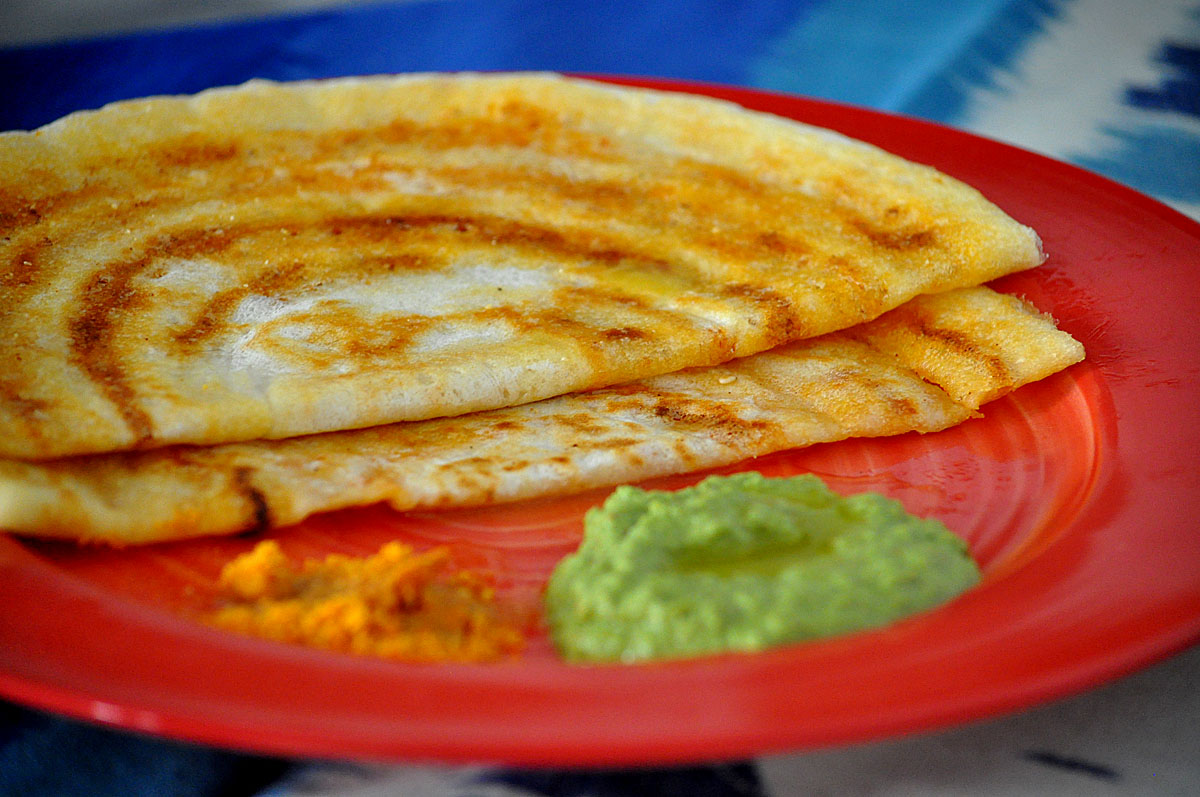
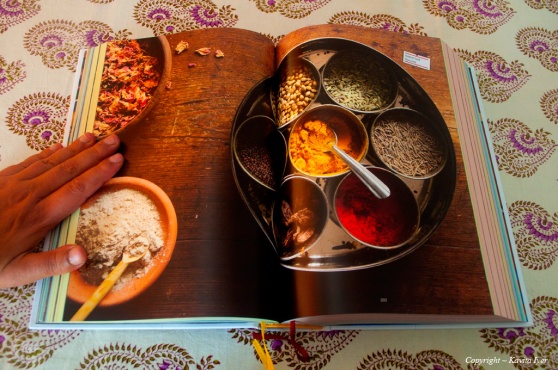
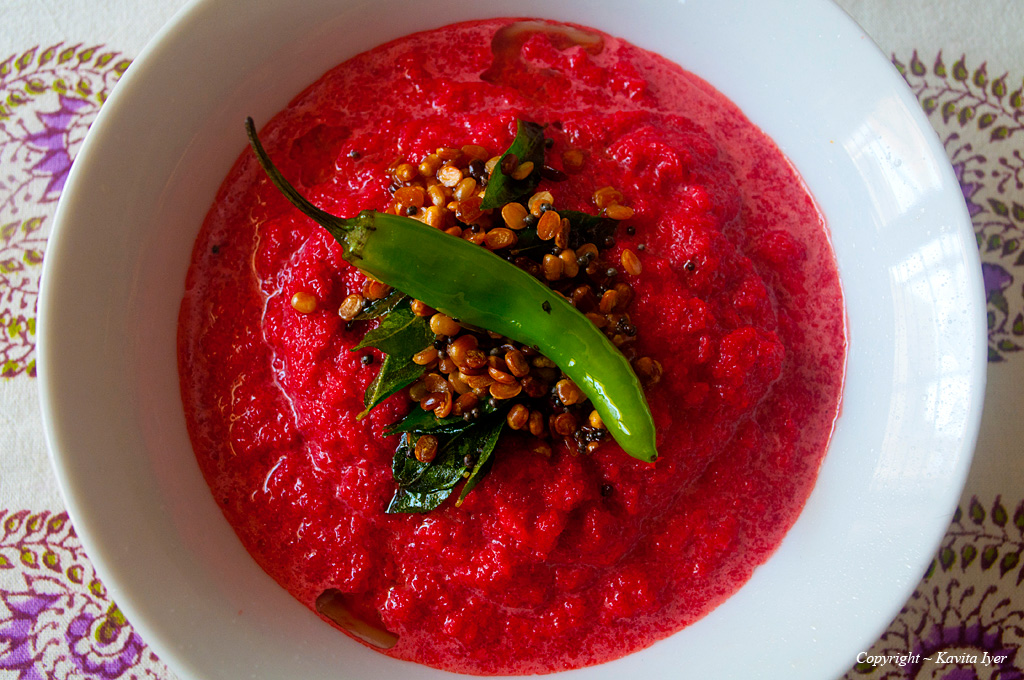
This tangy, spicy and a wee bit bitter-sweet preserve can be used as a spread on your toast or as chutney with idlis, dosas, pancakes or as a pickle with parathas or even as a rice mix to make delicious tomato rice. The luscious ripe tomatoes lend their tanginess to this preserve while the red chillies make it spicy; curry leaves add their freshness and aroma to it; while mustard and fenugreek seeds give it a slight bitter after taste and natural organic jaggery adds a hint of sweetness to it.

Although the ingredients are simple, this preserve needs a lot of patience and love, as do all good things in life. It takes almost three hours of constant monitoring for the juice of the tomatoes to dry up into this thick glossy preserve. I cannot describe the heady aroma that wafts through the house as soon as you start cooking and you start salivating inadvertently. You have to experience it to believe it. This Tomato Preserve will last you for atleast a fortnight; it needs to be stored in an air-tight container (preferably glass) and refrigerated properly.

Here’s presenting my first batch of special tomato preserve this summer and its recipe:

ThakkaliThokku8

TOMATO PRESERVE

Origin: Tamil Nadu

PREP: 30 mins PLUS COOLING TIME COOK: 2 1/2 HOURS TOTAL: 3 hourS

INGREDIENTS:

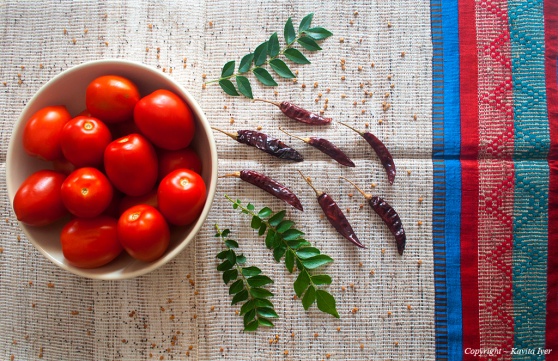
2 kg ripe organic tomatoes (roughly chopped)
2 tablespoon mustard seeds
2 tablespoons fenugreek seeds
5-6 sprigs curry leaves
5-6 red chillies
1 tablespoon chili powder
1 cup organic jaggery powder/wet jaggery
Salt to Taste

Cold Pressed Coconut Oil for Tempering

ThakkaliThokku1

DIRECTIONS:

Wash and chop the tomatoes roughly.

Take a skillet/kadhai with a thick bottom and put it on the gas on medium flame. Add three tablespoons of coconut oil. Once the oil is hot add the mustard seeds. Let them splutter. Then add the fenugreek seeds and the curry leaves. Roast for the next 2-3 minutes or until you get the bitter sweet aroma from them.

Add the chopped tomatoes and the whole red chillies. Cover with a lid and let it simmer for approximately one and a half hour or until the juice of the tomatoes reduces to half. Keep checking and stirring the mixture intermittently.

ThakkaliThokku2

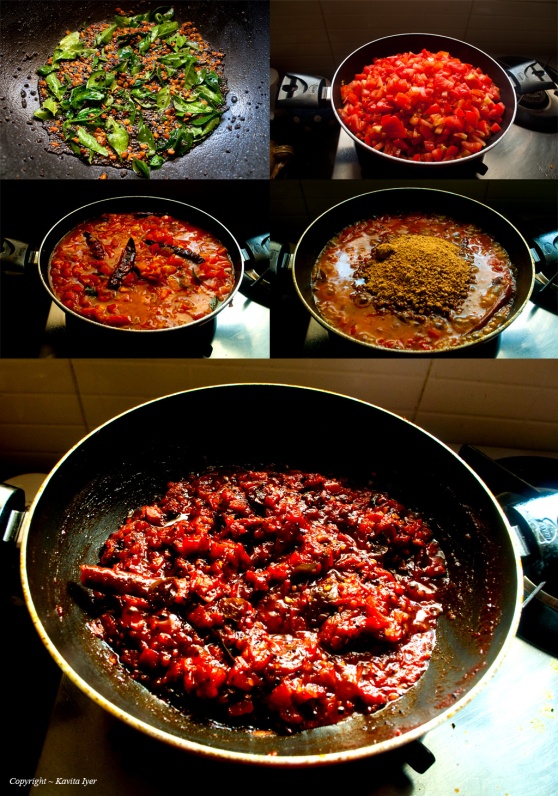
Reduce the flame to low and then add the jaggery, chilli powder and salt. Mix it and again cover the skillet with the lid and let it cook for atleast 45 mins to one hour until the mixture thickens and the juice of the tomatoes dries completely. This time around, keep checking and stirring every five minutes otherwise there are chances that it might burn at the bottom.

ThakkaliThokku3

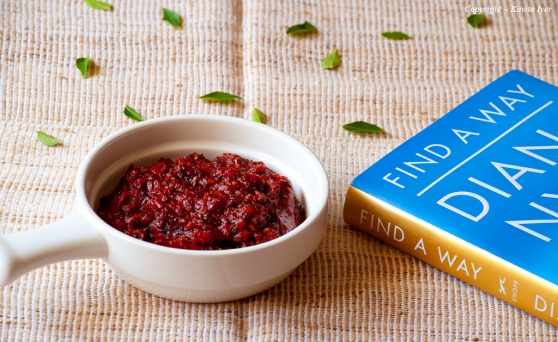
Once done let the mixture cool down completely. Then blend it to a paste in a blender or food processor.

ThakkaliThokku7

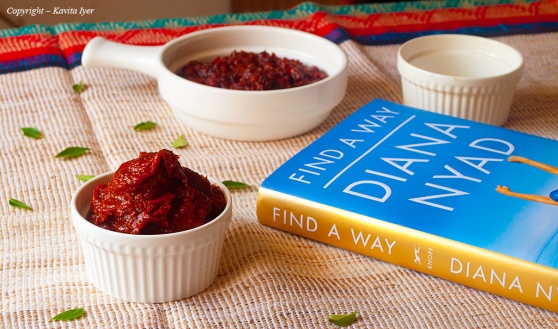
The preserve is ready. Don’t forget to store it in an air tight glass container and refrigerate it.

Hope you try this delicious and nutritious Tomato Preserve and love it as much as we do.

Cheers.

India Cookbook ~ A Book Review with Pant’s Recipes (Part 1)

India_Cookbook1

India Cookbook shares with us, the secrets behind Indian home cooking and features over 1000 recipes and 200 colour photographs and illustrations. The first 18 pages of the book is dedicated to the history, influences, techniques and tastes of each region, covering Kashmir, Punjab, Rajasthan, Agra and Delhi, Awadh, Bengal, Hyderabad, Tamil Nadu, Kerala, The Western Coast, and tribal food from Trans-Himalayan Region and The North and Northeast. It is an enlightening read which really showcases the diversity of our Indian cuisine, and more importantly seduces you with its exquisite descriptions.

India Cookbook isn’t like your typical cookbook because the author Pushpesh Pant is an academic who has spent the last 20 years researching and traveling the gastronomic regions of India to compile this remarkable culinary bible.

India_Cookbook3

India_Cookbook4

As you will see in these pictures i have shared, each section is colour-coded and grouped into categories of spices, mixtures and pastes; pickles, chutneys and raitas; snacks and appetisers (with sub-categories for vegetables, fish and seafood, and meat), main dishes (also with the same sub-categories as appetisers), pulses, breads, rice, desserts, drinks and guest chefs. But if you are looking for a specific recipe then you might have some trouble locating it (unless you have bookmarked it earlier) as this huge book does not have a proper (per recipe) index.

India_Cookbook5

Since I have got the book, I think I have managed to skim through each of the 800 or so pages of this mammoth cookbook, a handful of times; but what I get out of it each time, is always different. Just so much has been condensed into this collection – the culture, thousands of authentic family recipes and the striking photos.

India_Cookbook6

India_Cookbook7

But this is not a picture book like so many other cookbooks. Though there is very nice photography throughout, most of the recipes are left up to your imagination. Being a visual person I would’ve liked at-least one photograph per recipe.

India_Cookbook8

Having said that, I turn to Pant’s book regularly. When I need inspiration I know I will find it within India Cookbook. But then, I don’t follow many of the recipes exactly. Instead, I look at a recipe, think what a great idea and then I’m off to try to create something different or tweak the original recipe to my taste.

So I guess by now you are wondering what I ended up attempting to cook from this marvelous cookbook? Here are a few tried and tested recipes that I have adapted from the India Cookbook by Puspesh Pant.

Sago_Uttappa2

SABUDANA UTTAPPAM
Sago Pancakes with Chopped Greens
(Recipe Adapted from India Cookbook by Pushpesh Pant)

These pancakes are crisp on the outside and melt-in-the-mouth soft at the center. Nutritious and filling they make for an amazing breakfast or snack for kids. I bet once you try them, they will become a staple in your home.

Origin: Tamil Nadu

PREP: 30 mins plus soaking time COOK: 20 mins TOTAL: 1 hour

INGREDIENTS:

¼ cup Sabudana/Sago
½ cup natural yogurt
1 cup rice flour
1 onion (thinly chopped)
1 green chilli (thinly chopped)
2 small sprigs of curry leaves
2 tablespoons coriander leaves (thinly chopped)
Salt to Taste

Clarified butter/Ghee for cooking

Sago_Uttappa1

DIRECTIONS:

Soak the sabudana in ½ cup water overnight.

In the morning add the yogurt, rice flour, onion, green chilli, curry leaves and coriander leaves. Then season with salt and add enough water to make a batter of pouring consistency. Let it soak for 1 hour.

Heat a little ghee on a frying pan (skillet) over medium-low heat and pour a ladleful of the batter in the frying pan once it is hot. Spread it over the base like a pancake and fry for about 2 minutes or until golden brown. Flip over with a spatula and fry the other side for a further 2 minutes.

Transfer to a serving plate and repeat with the rest of the mixture.

Bon Apetite.

Beetroot_Thuvial1

BEETROOT THUVIYAL
Beetroot (Beet) Chutney
(Recipe Adapted from India Cookbook by Pushpesh Pant)

Sweet, tangy n spicy, this delicious chutney goes very well with dosas/uttappas (savoury pancakes), rotis/parathas (breads), hence makes for a great side dish.

Origin: Tamil Nadu

PREP: 20 mins COOK: 5 mins TOTAL: 25 mins

INGREDIENTS:

1 Beetroot (peeled and grated)
2 tablespoon grated coconut
1 long green chilli (thinly chopped)
1 small green chilli (for garnish)
2 tablespoon tamarind extract
1 teaspoon mustard seeds
1 teaspoon urad dal
½ teaspoon asafoetida powder
2 small sprigs curry leaves
Salt to Taste

Cold Pressed Coconut oil for Cooking and Tempering

DIRECTIONS

Heat 1 teaspoon coconut oil in a frying pan (skillet) over medium flame. Add the beetroot and fry for about 5 minutes or until tender. Let it cool down. Then add the beetroot, coconut, green chilli, tamarind extract; season with salt and blend  it in a blender or food processor. Add 2-3 tablespoons water for smooth consistency. Remove in a bowl once done.

For the tempering heat ½ teaspoon coconut oil over low-medium flame. Once oil is hot add mustard seeds. Let them splutter. Then add urad dal and fry until light brown. Switch off the flame and add curry leaves and a small green chilli.

Garnish this tempering on the chutney and your Beetroot Thuviyal is ready to eat. This should be eaten immediately.


Hope you enjoyed the review and the recipes I have featured here from the India Cookbook by Pushpesh Pant. Do try them and give me your feedback. Also look out for more exciting recipes in the Part 2 of this feature.

“The only book on Indian food you’ll ever need.” is written boldly on the front cover. Though I don’t know about that, I definitely would not want to be without my copy of the India Cookbook.

Thank you for visiting.

Book Title : India Cookbook
Author: Pushpesh Pant
Rating: 4/5

Coriander-Dill-Mint Smoothie

Green Smoothie

Coriander or cilantro is a wonderful source of dietary fiber, manganese, iron and magnesium as well. In addition, coriander leaves are rich in Vitamin C, Vitamin K and protein. They also contain small amounts of calcium, phosphorous, potassium, thiamine, niacin and carotene. The health benefits of coriander include its use in the treatment of skin inflammation , high cholesterol levels, diarrhea, mouth ulcers, anemia, indigestion, menstrual disorders, smallpox, conjunctivitis, skin disorders, and blood sugar disorders, while also benefiting eye care.

This aromatic coriander-dill-mint smoothie with a touch of lemon makes for a wonderful start to your day. Light, herbaceous and excellent for your digestive tract it’s a yummylicious treat.

CORIANDER-DILL-MINT SMOOTHIE

PREP: 20 mins 

Green SmoothieIngredients:

2 1/2 cups Coriander Leaves (including stalks)
1 cup Dill Leaves (including stalks)
1 cup Mint leaves
1 tablespoon Lemon juice
1 cup water
Pinch of Salt 

Directions:

Take the bunch of coriander, wash at-least 2-3 times until the grime and dirt is washed away. Remove roots. Then add to the blender. Repeat the same procedure for the Dill and Mint leaves. Add lemon, water and salt. Blend and drink up this amazing glass of goodness.

Of Healthy Breakfasts and Green Juice Week

Didn’t your mom always tell you breakfast was the most important meal of the day? Of course she was right. According to me, eating breakfast gets your morning started on the right track. It helps you keep your energy up and make healthier eating choices throughout the day.

DSC_0187a

My very own Ghee-Podi-Roast-Dosa served with a coriander coconut green chutney

Some people believe that skipping breakfast may help them lose weight. Not so! Skipping meals often leads to overeating later in the day. Becoming over hungry often leads to a lack of control and distorted satiety signals (meaning it’s hard to determine when you’re full). This can result in taking in more calories than if one had an appropriate breakfast. As a matter of fact, it’s easier to control one’s weight by eating smaller meals and snacks more frequently.

Breakfast skippers also have a harder time fitting important nutrients into their diet. Many foods eaten at breakfast contain significant amounts of vitamins C and D, calcium, iron, and fiber.

“Never work before breakfast. If you have to work before breakfast, get your breakfast first.” ~ Josh Billings

DSC_0115a

Spices that make the sweet-n-spicy milagai podi

In our household, breakfast is the most important meal of the day. It’s the heaviest and healthiest meal of the day. I ensure that we have a good combination of fruits & vegetables, grains, dairy and protein during breakfast. Generally we have a high fibre oats with milk, nuts, fruits/vegetables and eggs on weekdays but on weekends we indulge in the luxury of an elaborate Indian healthy breakfast. Upma, poha, idlis, dosas… did I mention dosas?!! They are by far our most favourite.

For those who are not very familiar with dosa, it is an Indian style crepe or thin pancake. Its originated from the southern part of India (from where I hail) and is quite a staple there. It is usually made by mixing rice and lentils in a particular ratio and then ground and fermented before making crepes out of it.

DSC_0173a

A basic dosa sprinkled with the magical milagai podi and ghee and voila you have the most delicious lipsmacking dosa getting ready to be gobbled down 🙂

Some dosas are savory and some are sweet. Some are thicker and soft while others are thinner and crisp. They can be made with wheat flour, a lentil based batter, semolina based batter and what not. But to share with you here I decided to pick the kind that is most common and also popular made with – Ukda Chawal (Parboiled rice) and Urad dal (Split black gram)

Today I am sharing with you the recipe of my very own Ghee-Podi-Roast-Dosa. Milagai podi is an absolutely delectable combination of spices which when had, ensures that there is an explosion of sweet-n-spicy flavours in your mouth. Different people use different spices to make this powder. Down south, each household has their own milagai podi recipe. This particular recipe of milagai podi has been concocted by me after a lot of permutations and combinations of the spices.

So my Ghee-Podi-Roast-Dosa is actually the basic dosa that is sprinkled with the milagai podi and roasted in ghee… the end result is nothing but magic!

Store the Milagai podi in air-tight containers and you can enjoy it for about 6 months

Store the milagai podi in air-tight containers and you can enjoy it for about 6 months

For Dosa Batter –

Ingredients:

3 cups of Ukda Chawal (Parboiled rice)
1 cup Urad dal (Split black gram)
1 tblspn Asafoetida powder
Salt to taste

Method:

  1. Combine the parboiled rice and split black gram, wash well and soak in water for 6 hours.
  2. Drain after 6 hours and grind (preferably in a wet grinder for better consistency of the batter) in a blender, gradually adding 1-1½ cups of water.
  3. Mix in asafoetida powder and salt. Set aside to ferment for 4-6 hours (in summer) or 8-10 hours (in winter). Add a little water, if necessary, to make a thick batter of pouring consistency.

For Milagai Podi –

Ingredients:

1½ cups Urad dal (Split black gram)
1 cup Til (White sesame seeds)
¾ cup Chana dal (Bengal gram)
½ cup shelled peanuts
13 medium size red chillies
3-4 tbspn jiggery
4 tspn chilli powder
2 tbspn Til oil (Sesame oil)
Salt to taste

Method:

  1. Roast the sesame seeds in a dry frying pan over moderate heat till golden and remove from pan.
  2. Dry roast the peanuts again on moderate heat for approx.  5-7 minutes. Remove from pan to cool.
  3. Pour 1 tbspn oil into pan and heat through. Add red chillies and fry for 1-2 minutes only. Remove and set aside.
  4. Pour remaining oil into pan and add first Bengal gram. Fry till golden and its aroma starts to fill the kitchen. Once done set aside and then roast split black gram till golden.
  5. Mix all ingredients together and grind to coarse powder in two batches for better result.
  6. Store in air tight container and use as required.
Yummy ghee podi roast dosas ready to be eaten

Yummy Ghee-Podi-Roast-Dosas ready to be eaten

Preparation of Ghee-Podi-Roast-Dosa:

Ingredients:

Dosa batter
Milagai podi
Ghee (clarified butter)

Method:

  1. Heat a griddle (non-stick tawa). To test sprinkle water on the griddle, if the water sizzles away right the moment then the griddle is hot enough.
  2. Now pour a ladle of dosa batter. Starting from the center in an outward direction, swirl the ladle in a circular motion spreading the batter into a thin crepe.
  3. As soon as the batter is spread, sprinkle 1 tspn of milagai podi on the dosa. Add 1 tspn of ghee evenly around the edges and center of the dosa.
  4. Give it a few more seconds and the bottom of your dosa will start getting darker and golden brown in color. This means your dosa is almost ready.
  5. With the help of the ladle fold one side of the dosa onto the other half and serve with green chutney and healthy juice/filter coffee.

Bon Apetite.

Ghee Podi Roast Dosa served with coriander coconut chutney and a green juice :)

Ghee-Podi-Roast-Dosas served with coriander coconut chutney and a sooper healthy green juice

I served it today with a healthy green juice. My dear friend Pratishtha is completing her 365 breakfast recipes for ‘The Breakfast Projekt’ this week. So as a part of the celebrations I am joining her in creating 7 new green juice recipes and incorporating them in our breakfast for the coming whole week.

Did you know that these greens, these antioxidant jackpots are also ideal sources of calcium and vitamins A, C and K?

Come back later next Sunday to see my 7 green juice recipes and how green can be made delicious too! Meanwhile you can visit, join, follow Pratishtha’s ‘The Breakfast Projekt’ at http://www.breakfastprojekt.com/ or join her page on facebook Gourmet Sojourn for her recipes of the green juices https://www.facebook.com/groups/gourmetsojourn/574552735900690/?notif_t=group_activity

You have a Healthy n Green Sunday!